Audiotuts+ Updates - How to DJ with Ableton Live |  |

| Posted: 13 Dec 2010 03:05 PM PST Twice a month we revisit some of our reader favorite posts from throughout the history of Audiotuts+. This tutorial was first published in October 2008. Ever wanted to DJ with Ableton Live? Here's how! While it's true that you can produce a complete live show with Ableton Live, bringing your studio production to stage, some would just like to mix their favorite tracks "a la DJ.” The most basic principle of DJing is to have a set of tunes playing continuously — no jumps, no cuts, no funny transitions, just as if all the pieces in the playlist were one. A long tune of an hour or more.
Thumbnail image courtesy of Dade. There are many sets of tools to help you achieve this, the most common being turntables and a selection of vinyl records. Others DJ with CDs instead, while some resort to laptops and DJing software and a few even use iPods. No matter what set of tools and techniques you choose, DJing will always require the smooth transitioning and syncing of musical pieces. An Ableton Live DJ can do many things:
What you definitely need:
What you might optionally want:
I don't like plugging my laptop's headphone output to the main mixer. I prefer to use either a USB or FireWire audio interface. You can get by without an audio interface, but there are definitely some advantages to using one: Sturdier outputs: Your audio interface is bound to have better outputs than your laptop's flimsy stereo mini-jack or headphone output. RCA plugs, for example, require triple the strength to unplug than mini-jack plugs, and they normally do not make any noise if they are accidentally touched. If you have multiple I/Os you can plug your other instruments and FX units in: This is quite handy if you want to use that extra drum machine or that external FX unit, or even plug your microphone in and incorporate it all into your mix in Ableton Live. You can pre-listen to your samples in your headphones: this is perhaps the most important advantage of all. Let's say you have a sample collection from which you’d like to use some samples and you don’t want anyone else pre-listening to the samples while the mix is playing. Not to worry. Ableton Live will route the audio from these samples exclusively to your headphones. If you decide not to use an audio interface you will not be able to pre-listen to your samples. All audio will be routed to your laptop's line out (which is usually your headphone output). In this case it's better to select your samples beforehand and program your playlist. Getting StartedDownload this tutorial’s Play Pack. It contains two songs and an Ableton Live project to practice what you've learned. The Ableton Live file is only for reference at the end of the tutorial so there is no need to open it as soon as you unzip it. Unzip the "LiveDJtutorial.zip" file on your desktop and open Ableton Live. You should now have an empty session. A "tunes" folder should be in the zip file. Copy it to your desktop, and navigate to it from Ableton Live's File Browser. You will find 2 minimal house tracks: Minimal1.mp3 and Minimal2.mp3. See that blue headphones icon? It means that when you click on any song or sample in the browser list Ableton Live will play it a preview. 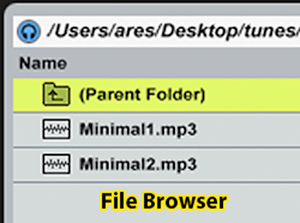 The Status Bar (at the bottom) will display a "previewing" message informing you of the properties of the audio file and its duration. In this case it's a 4:06 minute 44.1 kHz 16 Bit Stereo file. 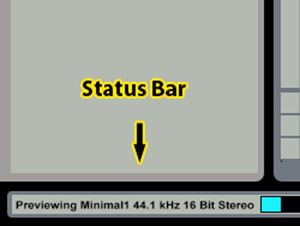 There are 2 main views in Ableton Live. One is the Arrangement View, which is pretty much like the arrangement section in Logic Pro or Cubase, as it has rows representing MIDI and audio tracks as well as a grid representing time in measures (top) and minutes (bottom). The Arrangement View is ideal when you want to see a clear representation of your music within a time reference. Also it's perfect for editing automated parameters such as track volume and pan with accuracy. 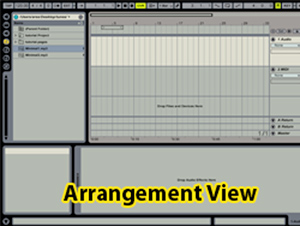 The other side of the coin is the the Session View which I find more suitable for working with loop-based mixes. It also gives us direct access to track parameters as each column represents a MIDI or audio track, a representation of a rack mixer. 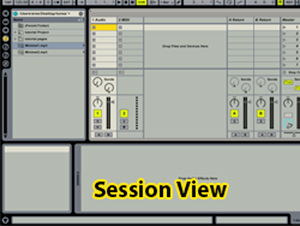 For this tutorial we will use the Arrangement View. Step 1 - Set the Project’s TempoSince we are working with 2 minimal house tracks, a good tempo would be 126 to 128 beats per minute. To set the BPM click on the tempo section of Ableton Live (upper left) and input "126." 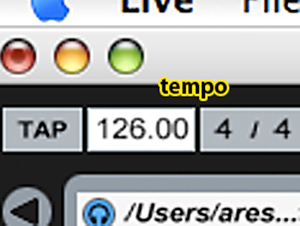 Step 2 - Import the TracksPress Tab or select the Arrangement View. Drag the file Minimal1.mp3 from the File Browser to the center of the Arrangement View. Do the same with the Minimal2.mp3 file. Ableton Live will automatically create a track for each audio file you import. 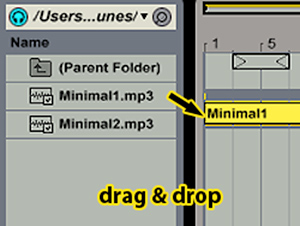 Step 3 - Open the Clip ViewThe files you've imported are now represented by a colored horizontal line. We call this a clip. Double click on the Minimal1.mp3 clip to open the Clip View (at the bottom). When you imported the track Ableton Live analyzed the file to determine its BPM. This is part of the "Auto Warp" function which will help sync your song to the project's tempo. Live did its best to guess the BPM in Minimal1.mp3—it says it's 120.01 but it's actually 120.00 BPM. To correct it input "120" in the Seg. BPM field. 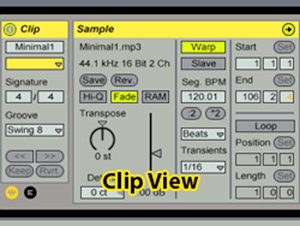 Step 4 - Set the Initial Downbeat of the TrackNext to the clip view we have the Sample Display section. This is where we can see a graphical representation of our audio clip. Ableton Live did a great job in guessing what the tempo of our audio clip is but it got the downbeat wrong. To properly beat-match our track we need to set the correct starting point. Our audio file has a silence at the beginning. This is not the downbeat—this is where our file starts, but not where any actual sound starts. We need to tell Ableton Live where we would like to really start our clip. To accurately do so, we must zoom into the first bar of our file, go to the Sample Display section, click-hold and drag down and you will see the zoom in action. 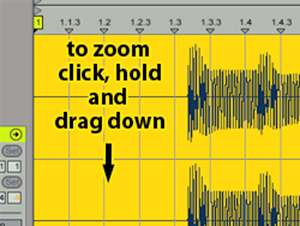 Notice the yellow rectangle with the 1 in it. That's an Auto Warp marker, and it marks the downbeat or starting point our audio clip. You can drag it until it meets the beginning of the sound transient. If the BPM setting on the clip is correct you will see how the grid aligns with the transients along the audio clip. This is an indication that our clip is beat-matched. 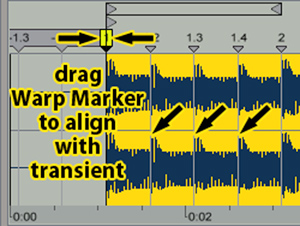 Repeat the previous steps with the Minimal2.mp3 clip. Notice that this audio file does not start with a kick but a silent note! This is a feature in many house or techno tracks—don't worry, just move the Warp Marker so that the second beat (1.2) aligns with the largest transient (the snare drum sound). Minimal2.mp3 has a tempo of 130 BPM. 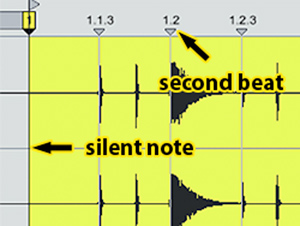 Our clips should be beat-matched now. Things are a lot easier when you know the tempo of each track you import, but what happens when Ableton Live does not detect their tempo accurately? Simple: double click the beat numbers to create more Warp Markers and manually pin them down to the correct transient. 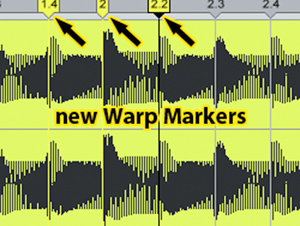 Step 5 - Position the ClipsDrag the Minimal2 clip to bar 97 where Minimal1 is about to finish. If you hit play at bar 97 you will hear that the two tracks sit well together, mostly because there aren't many sounds that would clutter our mix. Many dance music tracks start with a long prelude with hi-hats—this has the function of giving DJs a cue or a guide to sync the incoming track with the one currently played. The transition between tracks is achieved by gradually reducing the volume of the outgoing clip while increasing the volume of the incoming clip. We call this a crossfade. Most DJ mixers have a horizontal fader to mix the output of two turntables. We call this the crossfader. Ableton Live has one as well, but we will not use it in this tutorial as we will program our crossfade into the mix. 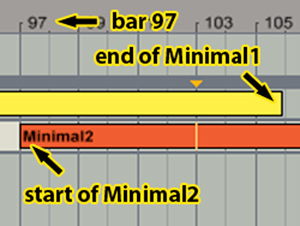 Step 6 - Draw a Crossfade Between the TracksTo automate parameters in the track display we need to "unfold" the tracks. The unfold button is an encircled triangle. Once the track is unfolded it will reveal an area with drop-down menus—these are called the Device and Control choosers. The device we want to edit is the Mixer and the control is the Track Volume. 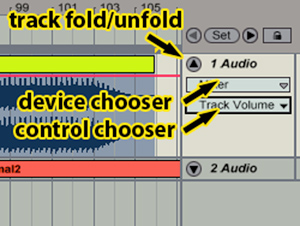 As you can see there is now a graphic representation of the audio files and a horizontal red line. This line is the envelope of the control you choose, be it Track Volume, Track Panning, or X-Fading. To draw our crossfade we need to create breakpoints in our envelope, and for that we need to double click it. We can delete them by double clicking. 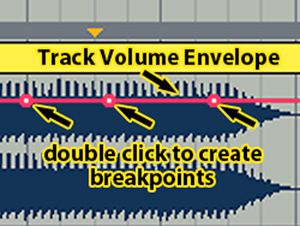 Once our breakpoints have been created, we can drag them and give the envelope any shape. Just like our clips, every envelope is interpreted by Ableton Live left to right, so to decrease the volume on Minimal1 we must set the highest breakpoint to the left and the lowest to the right. To increase the volume in Minimal2 we must do the opposite. Adjust the crossfade to your liking and you are done! 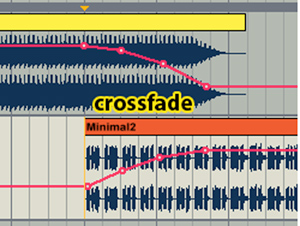 Try adding more tracks and some effects (perhaps a filter or a delay) and try to automate their parameters using the envelopes. Good luck!
|
| Quick Tip: How to Increase the Impact of Builds During Mastering Posted: 13 Dec 2010 12:45 AM PST Once you have exported your mix and started the mastering process, you may find that the impact of you track after any build ups or breakdowns may be slightly lacking. Of course you can go back to your mix to rectify this but often there is a quick fix that can work.
Import Your Finished Mix Into Your DAWGrab your exported mix and import it into a fresh project. It’s a great idea to start with a blank template so that you have room to work and use of your entire CPU. I find treating the mastering process as a different stage of production also gives you a fresh perspective on the project.
 The mix is imported. Apply Automation to the Affected AreaNow identify the area that needs a boost. Pay special attention to areas immediately after breakdowns, build ups and drops. You may notice that they lack impact and need an extra push. Now use volume automation to lower the section before the critical point of impact and create a small ramp. You can afford to make this pretty exaggerated, as dynamics processing during the mastering stage will generally smooth this out somewhat. Experiment with different curves and fade lengths here. You are really trying to create a ‘transparent’ effect so the listener is not aware of any massive changes in level. They certainly shouldn’t hear the fade at all. If you can hear it, keep on working! Repeat this process for every section in your song that needs it. And ensure all the ‘higher and ‘lower” level parts are pretty much the same throughout the project. Usually an increase of around 5 or 6 dB should really help.
 The automation is applied to the appropriate area
 … a zoomed out view Apply Your Final Mastering TreatmentWhen your done you can master your track as you normally would. If you find the contrast you have created is not great enough you can always go back and change your automation data until your satisfied. Really try and focus on not applying too much dynamics processing to your track here. Not only will this greatly reduce your dynamic range and suck the life out of your track but the work you have done with your automation will simply be lost.
 The master is now exported.
|
| You are subscribed to email updates from Audiotuts+ To stop receiving these emails, you may unsubscribe now. | Email delivery powered by Google |
| Google Inc., 20 West Kinzie, Chicago IL USA 60610 | |

1 comment:
adidas yeezy
bape shirt
yeezy shoes
palm angels
off white jordan 1
yeezy
fear of god hoodie
off white clothing
air jordan
bape t shirt
Post a Comment